


Key Takeaways
- The VT Markets app provides access to CFDs across markets such as forex, metals, indices, commodities, shares, ETFs, bonds, and cryptocurrencies, subject to account and regional availability.
- Select Buy when you expect the price to rise and Sell when you expect the price to fall.
- Trade size affects market exposure, margin requirements, and potential profit or loss.
- Stop Loss and Take Profit orders can help traders plan their exits, but execution at the selected price is not guaranteed.
- Before confirming an order, review the instrument, direction, order type, trade size, price, margin requirement, and applicable trading costs.
- Leveraged CFD trading carries a high level of risk. Beginners may consider practising the order process using a demo account before trading with real funds.
Placing your first trade on the VT Markets app starts with understanding what you want to trade, why you want to enter the market, and how much risk you are prepared to take.
The app allows traders to access different markets, review price movement, configure trading parameters, and manage risk before placing an order.
This guide explains the complete process, from selecting an instrument to placing, monitoring, and closing your first trade. It also introduces additional tools such as technical indicators, Trading Central, price alerts, the economic calendar, and account leverage settings.
Part 1: How to Place Your First Trade
Before You Start
Before placing a trade, make sure you have:
- Downloaded the VT Markets app and logged in
- Opened a live or demo trading account
- Selected the correct trading account
- Deposited sufficient funds if using a live account
- Enabled app notifications if you plan to use price alerts
For a first-time trader, practising with a demo account may help them become familiar with the order process before trading with real funds.
Step 1: Find and Select a Trading Instrument
The first step is choosing the instrument you want to trade.
On the VT Markets app, traders can browse market categories such as forex, metals, indices, energies, soft commodities, shares, ETFs, bonds, and cryptocurrency CFDs.
When selecting an instrument, consider the following factors:
- Market familiarity: Choose a market that you understand.
- Volatility: Some instruments may experience faster and larger price movements than others.
- Spread and trading costs: Wider spreads may increase the cost of entering and exiting a trade.
- Trading hours: Some instruments are available only during specific market sessions.
- Market events: Economic data, central bank decisions, earnings announcements, and geopolitical developments may affect prices.
Step 2: Add Instruments to Your Watchlist
For example, if a trader wants to follow gold price movement, they may search for XAUUSD in the app and add it to their watchlist for easier tracking.
How to add instruments
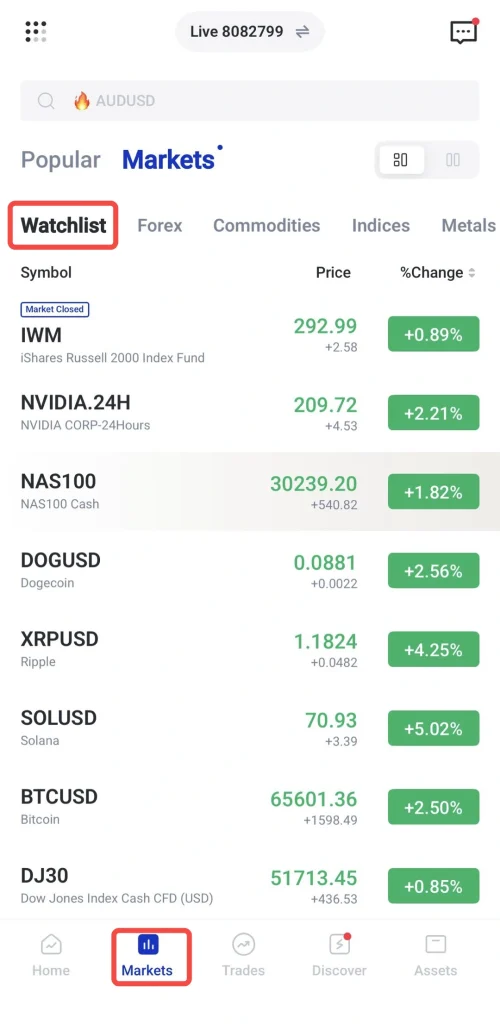
1. Open the VT Markets app
2. Go to the Markets section
3. Select the Watchlist tab
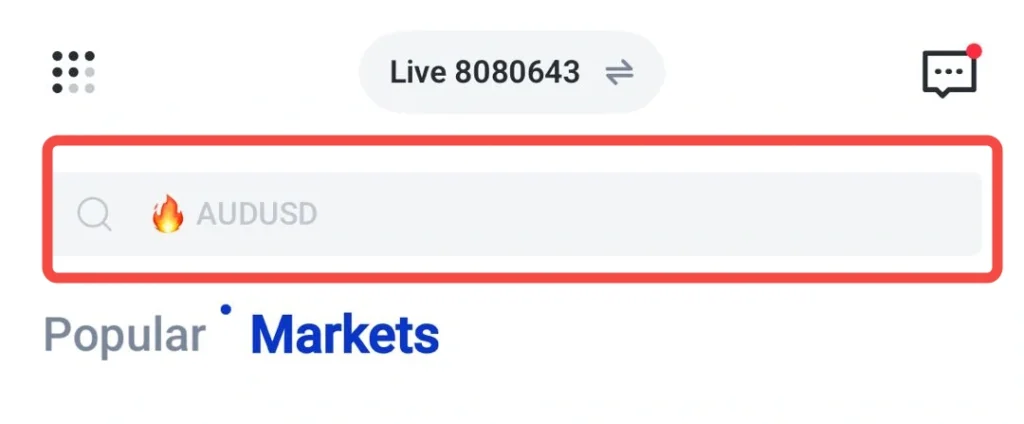
4. Search for the instrument you want to follow.
5. Tap the star icon to add the instrument to your watchlist.
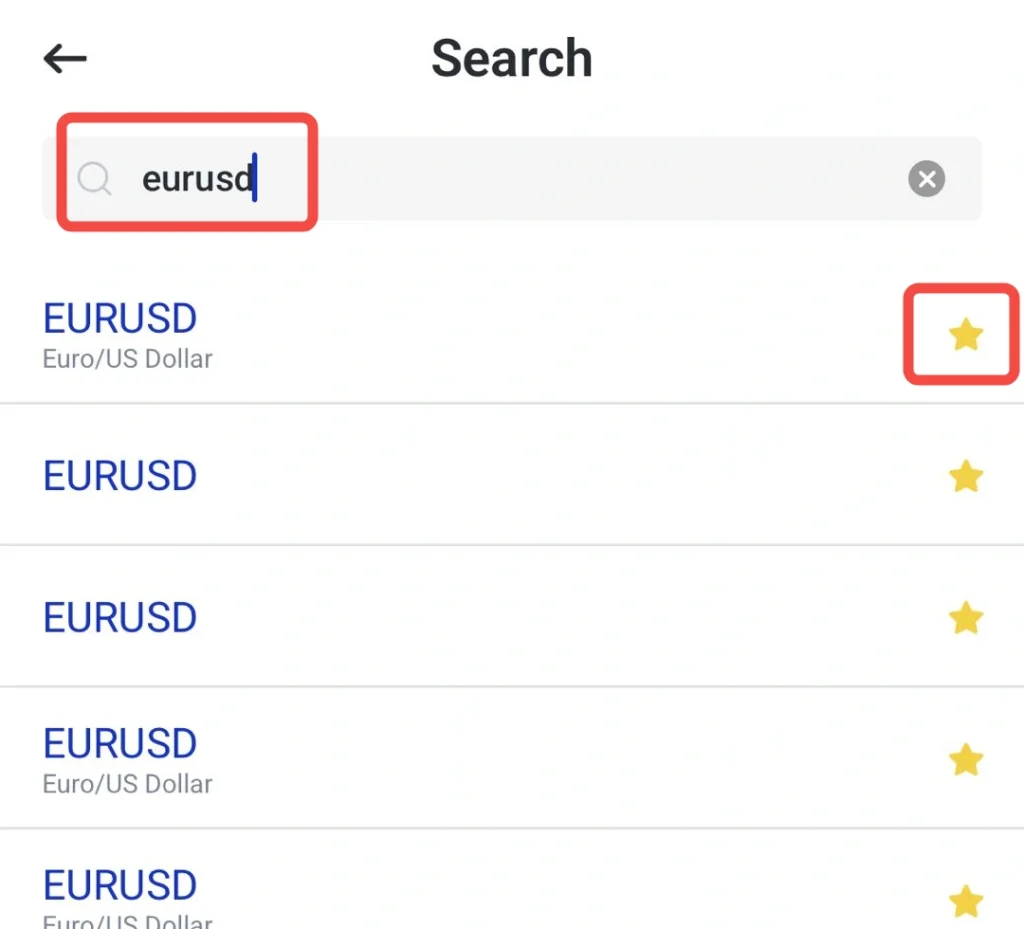
The watchlist allows traders to quickly access selected instruments without searching every time.
Step 3: Open the Selected Instrument and Set Timeframe
Once an instrument is added to the watchlist:
1. Tap the instrument (e.g. XAUUSD, EURUSD, NAS100)
2. Adjust the chart timeframe based on your trading approach:
- Higher timeframes (H4, D1) for overall trend
- Mid timeframes (H1) for structure
- Lower timeframes (M15, M5) for entry timing
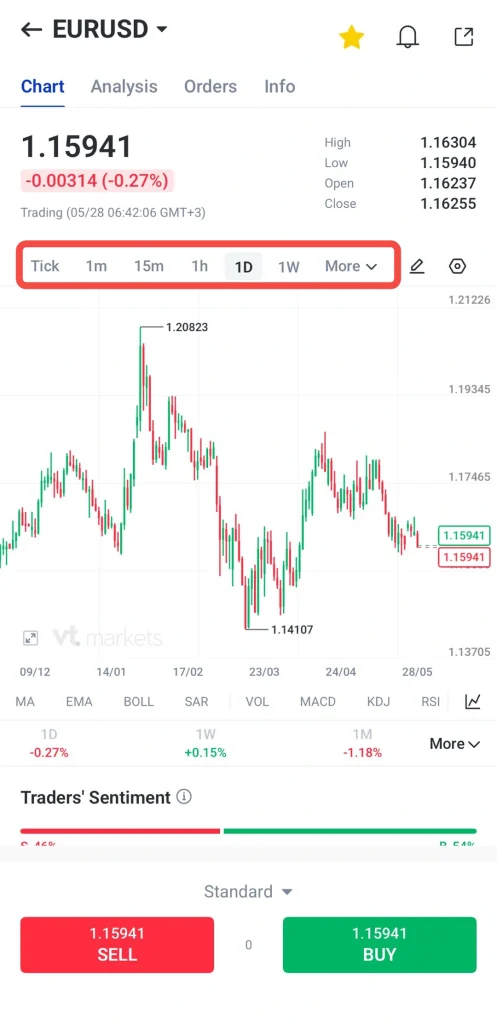
At this stage, traders can observe price movement and overall market structure before making any trading decision. You can choose either to Buy or Sell the symbols, after performing the following analysis:
- Buy: Select Buy if you expect the instrument’s price to rise. You may make a profit if it rises and a loss if it falls.
- Sell: Select Sell if you expect the instrument’s price to fall. You may make a profit if it falls and a loss if it rises.
Step 4: Set Trade Size and Leverage
Traders need to define how much exposure they want to take based on account size and risk tolerance.
How to Set Trade Size
Below is the step-by-step process:
1. Locate the lot size or volume field.
2. Enter the trade size based on your account balance and risk plan.
Tip: To understand more about trade size and lot, please read this article.
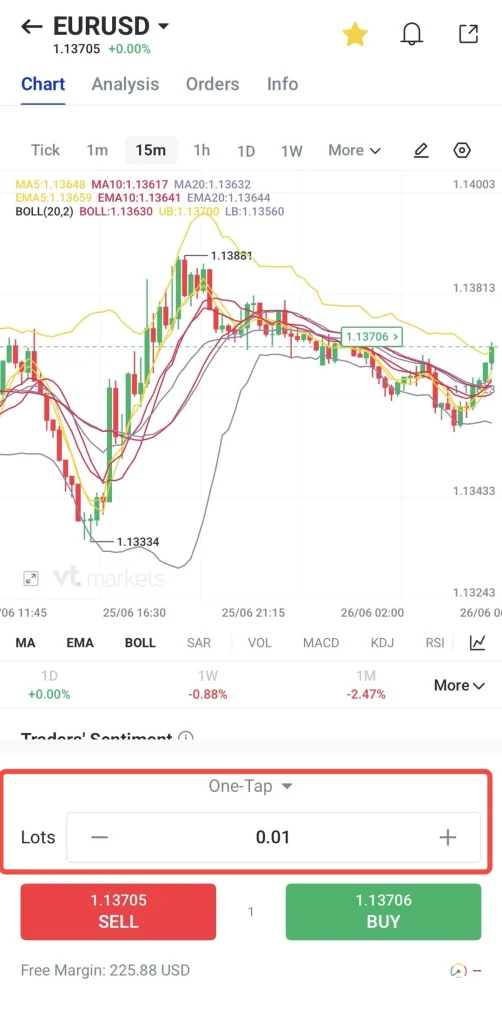
3. Check the margin requirement before proceeding.
4. Review available free margin to ensure sufficient balance.
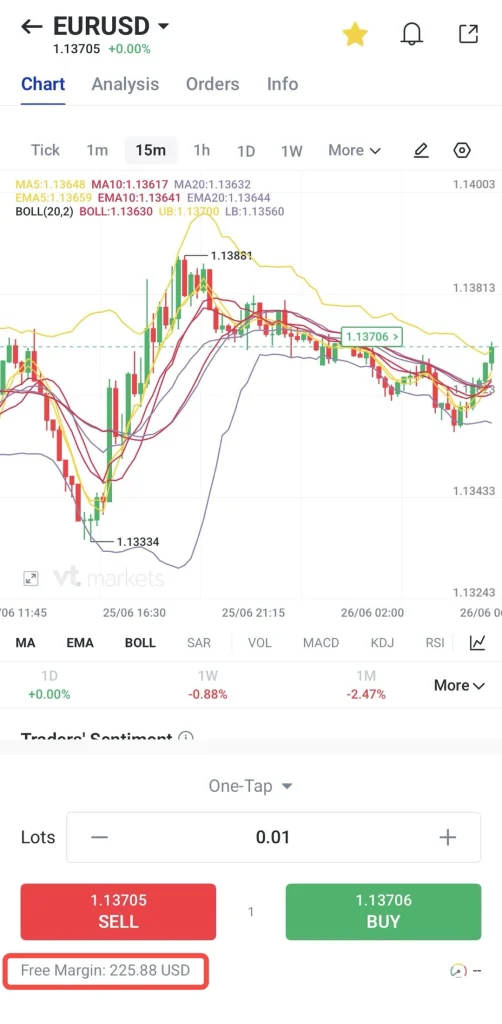
5. Estimate potential loss if the trade hits the stop loss level.
Trade size should always be proportional to account size. Smaller sizes reduce risk exposure, while larger sizes increase both potential profit and potential loss.
Step 5: Set Order Type, Stop Loss, and Take Profit
After reviewing the setup in detail, proceed to the Trade tab to configure the order parameters.
How to Set Order Type
Select the appropriate execution method based on your trading strategy:
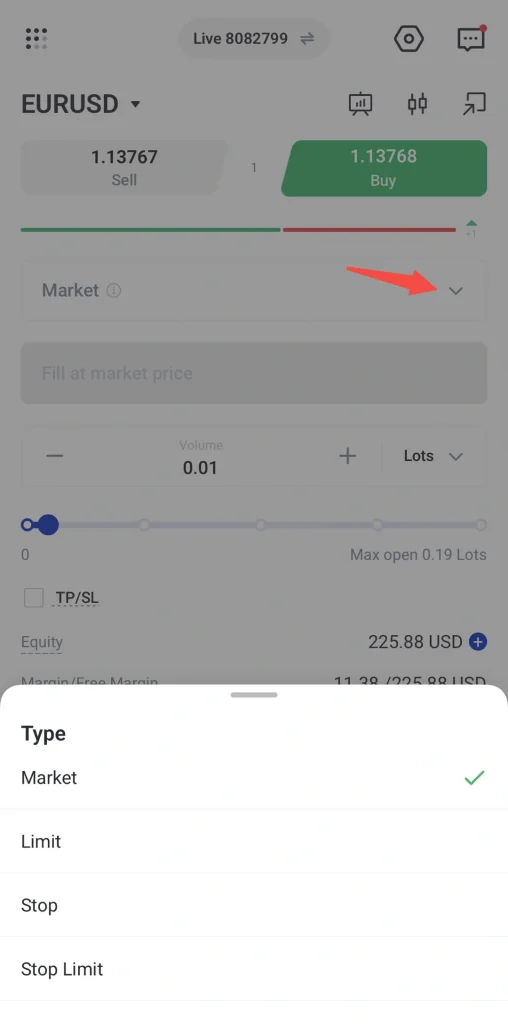
- Market order: Executes immediately at the current market price
- Limit order: Executes only when price reaches a more favourable level
- Stop order: Activates once price reaches a predefined trigger level
- Stop limit order: Triggers at a specified price, then executes as a limit order within the defined price range
How to Set Stop Loss and Take Profit
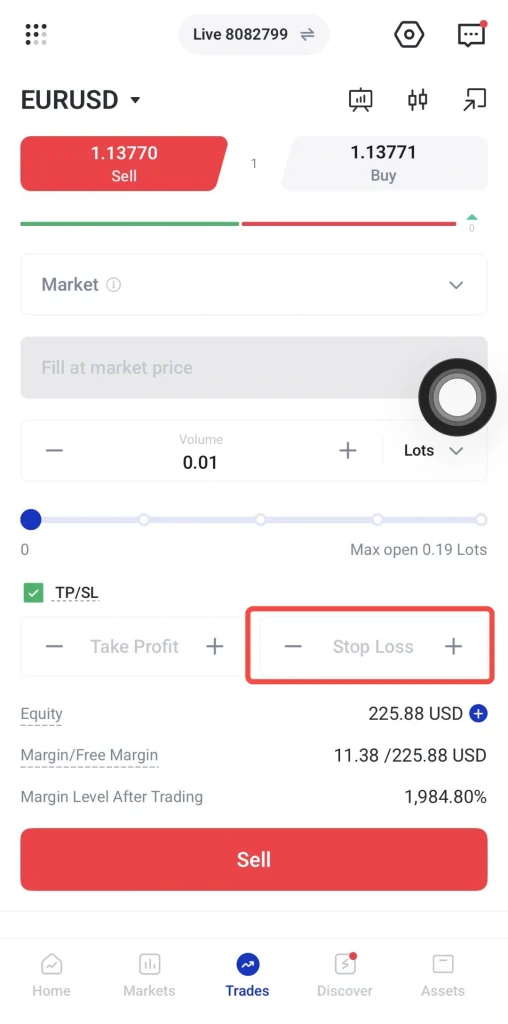
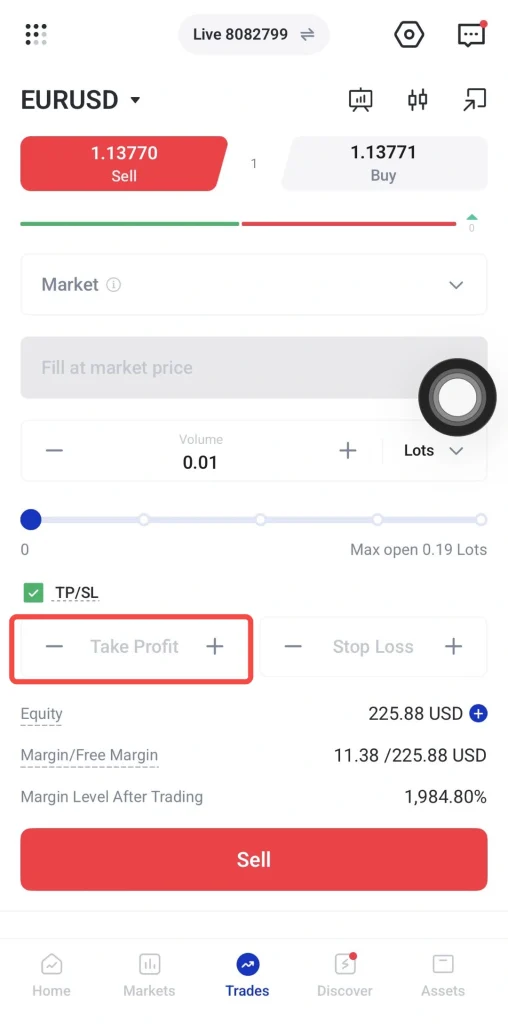
1. Scroll to the Risk Management section and enable the TP/SL option.
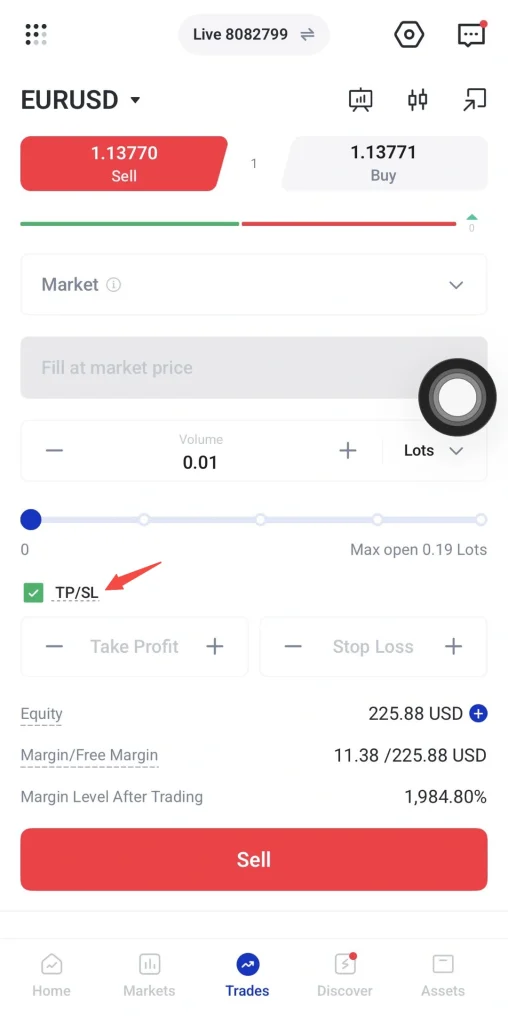
2. Enter your Stop Loss (SL) level to define maximum acceptable loss.
3. Enter your Take Profit (TP) level to define target profit.
4. Ensure both levels align with your trading plan and market structure.
Step 6: How to Review and Execute Trade
Before placing the trade, review all order details carefully.
1. Check the following details:
- Instrument name
- Buy or sell direction
- Order type
- Trade size
- Entry price or trigger price
- Stop loss level
- Take profit level
- Estimated margin
- Spread and other trading costs
- Available account balance and equity
2. Once confirmed, tap Buy, Sell, Place Order. The position will appear in the open trades or positions section of the app for monitoring.
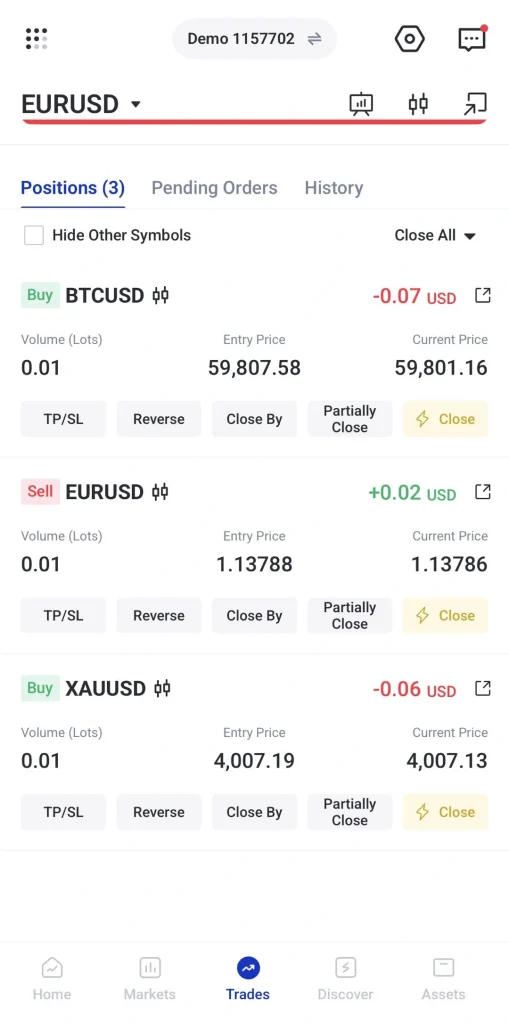
3. After the trade is open, monitor the position on the trades tab.
Traders can view floating profit or loss, margin level, and the current market price.
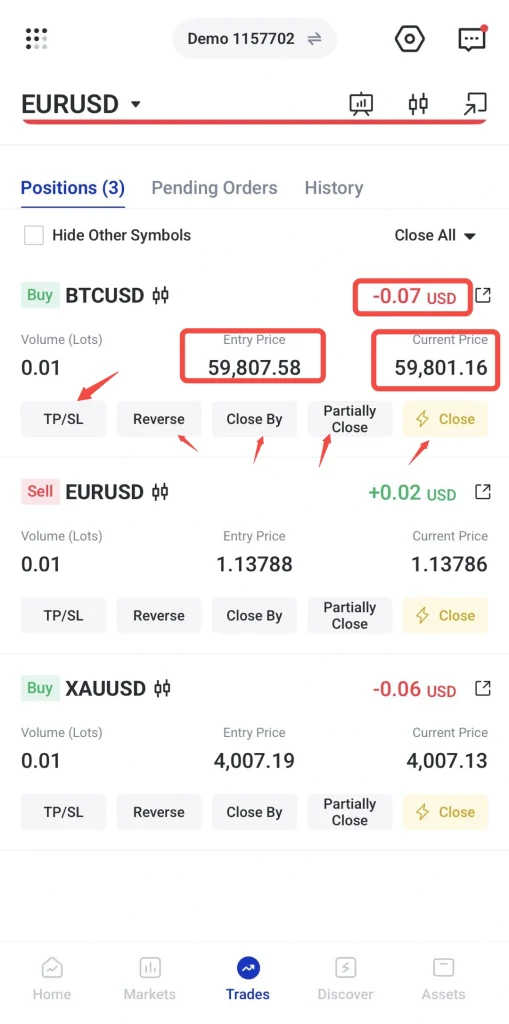
Traders can also adjust stop loss or take profit levels. However, changes should be based on a trading plan, not emotional reactions to short-term price movement.
Step 7: Close Your Position
1. Go to the Positions tab.
2. Select the position you want to close.
3. Tap the Close button.
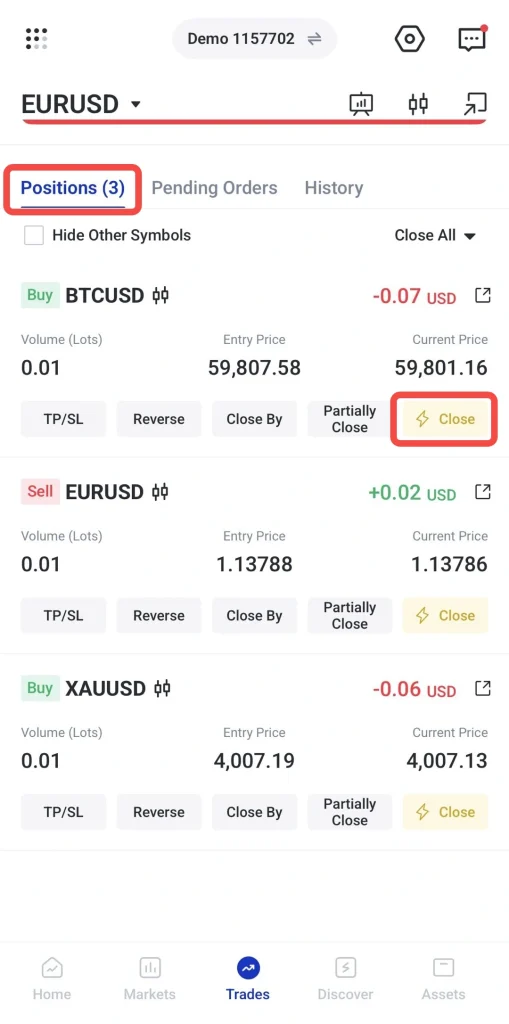
4. Review the position details and confirm the closure.
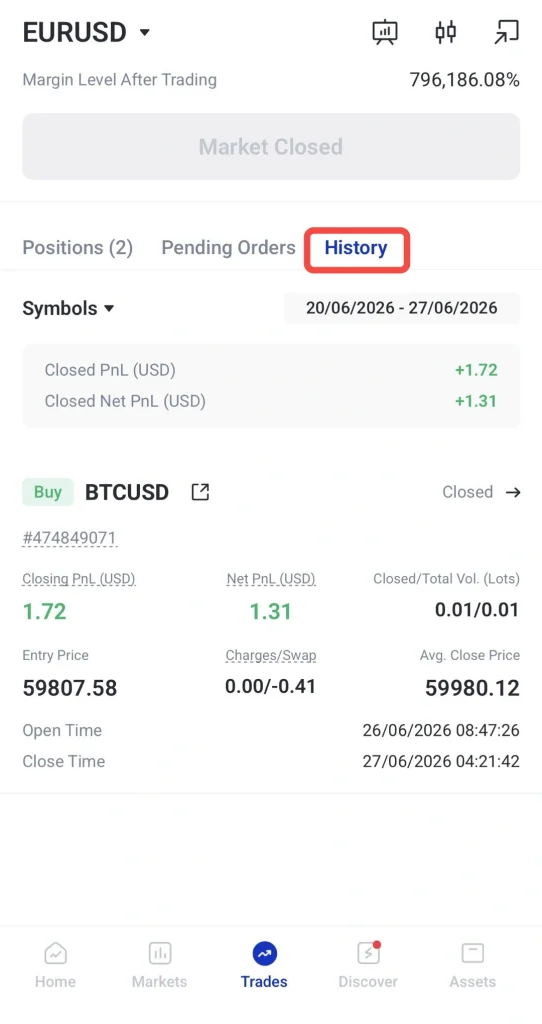
5. Check the History tab to view the final profit or loss and any applicable charges.
Part 2: Additional Analysis and Monitoring Tools
Step 8: How to Use Indicators and Market Analysis
After opening the chart, traders analyse the market using a combination of technical indicators and technical analysis. This helps build a trading bias before deciding whether to buy or sell.
How to Use Technical Indicators
Below is the step-by-step process:
1. Tap the selected instrument (e.g. EURUSD) and open the chart view.
2. Select the indicator you want to use.
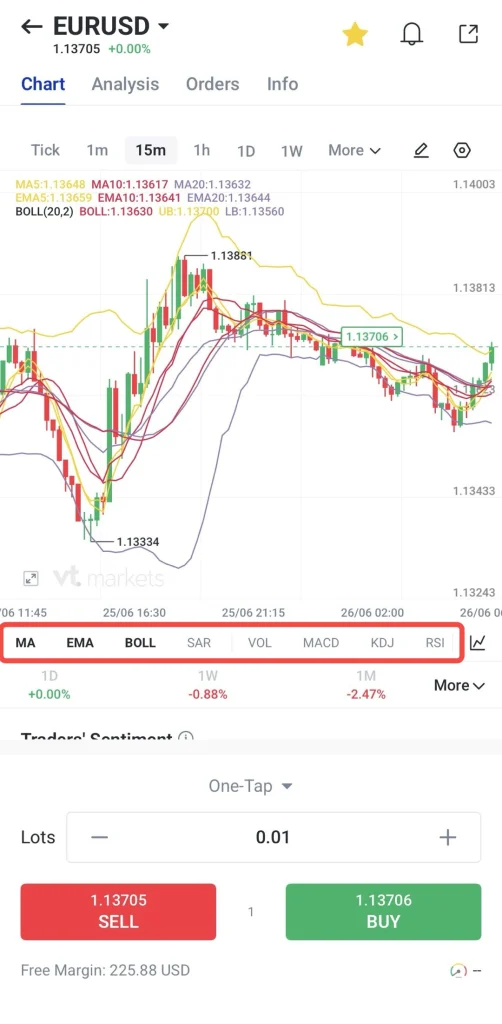
3. Apply it to the chart for analysis.
Common indicators include:
- Moving Averages: identify trend direction
- RSI: measures momentum and overbought/oversold conditions
- MACD: identifies momentum shifts and trend changes
- Support & Resistance tools: highlight key reaction zones
Traders often combine more than one indicator to confirm market direction.
Step 9: How to Use Trading Central Analysis
Below is the step-by-step process:
1. Tap the selected instrument (e.g. EURUSD) and open the chart view.
2. Click the Analysis section.
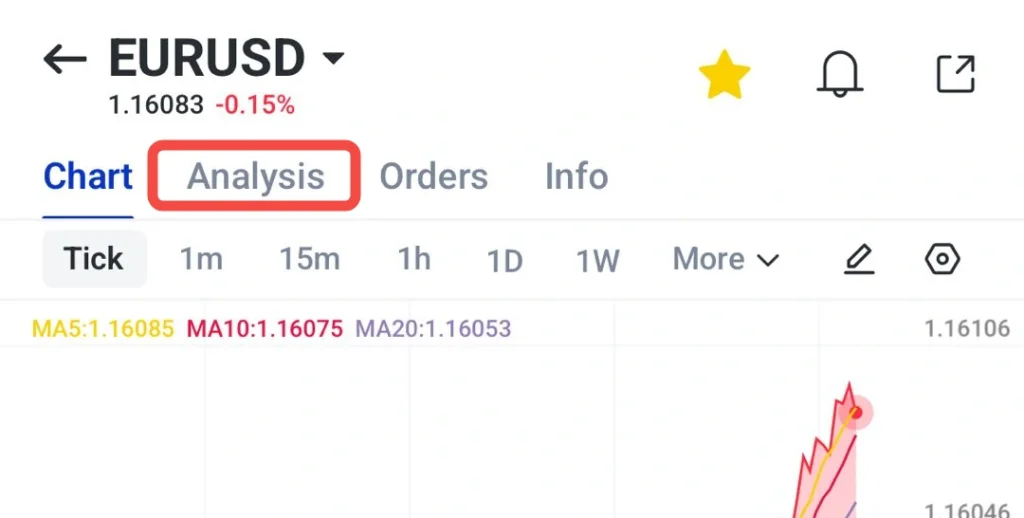
3. Select any Trading Central report or market update.
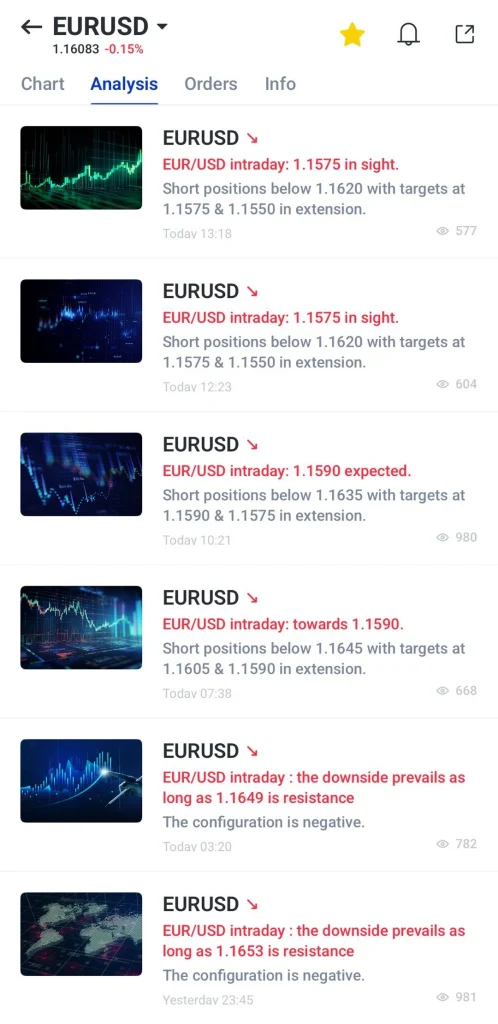
4. Review technical outlook, price levels, and commentary.
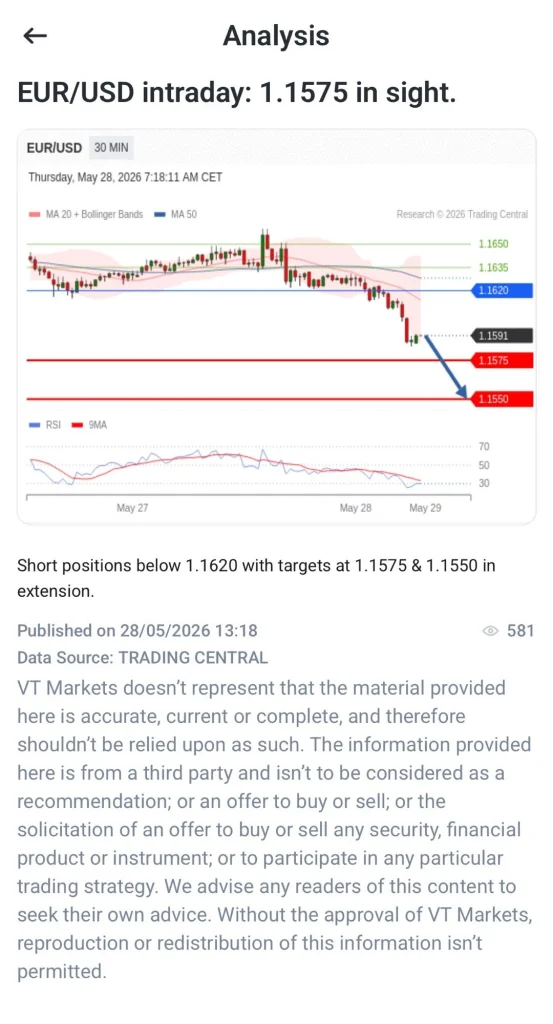
5. Compare the analysis with your own chart view.
6. Use it as additional reference for trade planning.
Step 10: How to Set Price Alerts
Price alerts help traders monitor key levels without constantly watching the chart. This is useful when waiting for a specific entry or breakout level.
How to Set Price Alerts
1. Open the VT Markets app
2. Select the instrument you want to set a price alert.
3. Tap the notification bell icon at the top of the chart page.
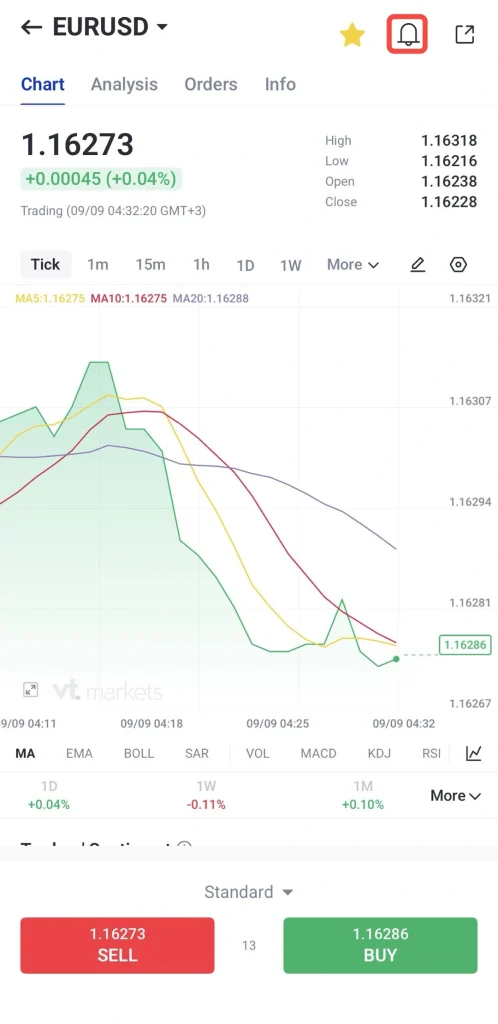
4. Tap Add Alert.
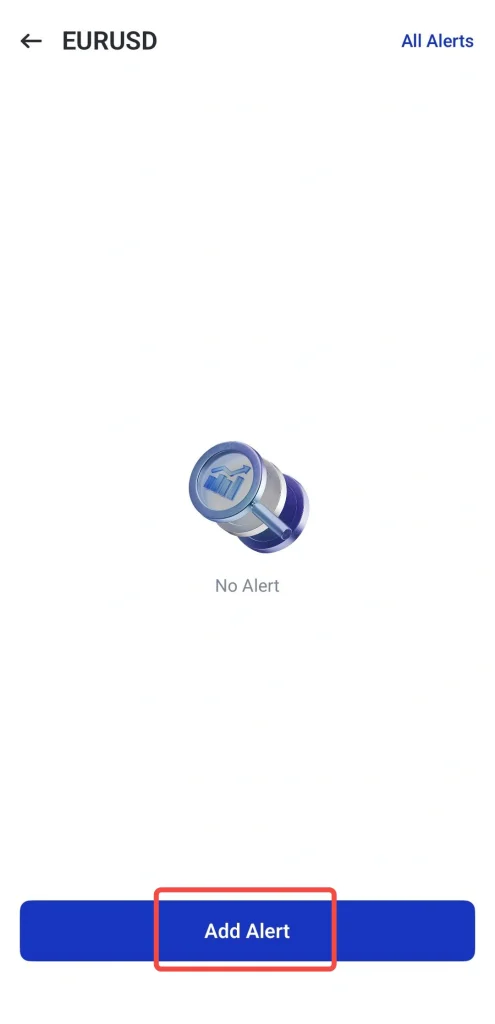
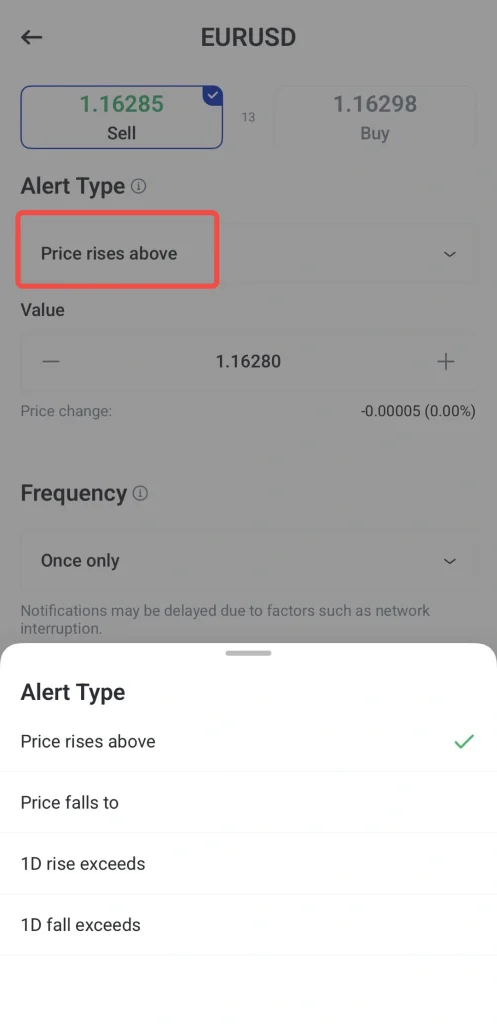
5. Select your preferred alert type, such as Price rises above, Price falls to, 1D rise exceeds, or 1D fall exceeds.
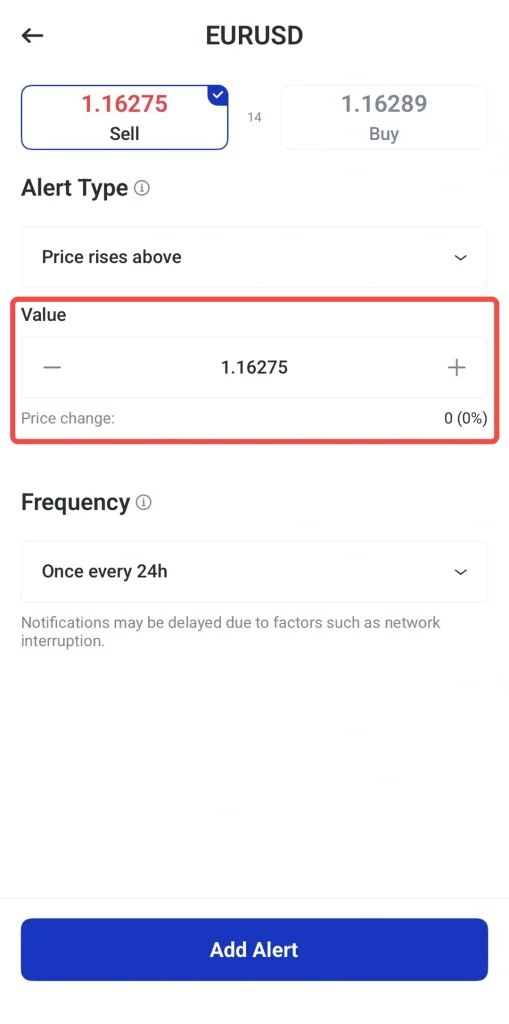
6. Set your preferred price value.
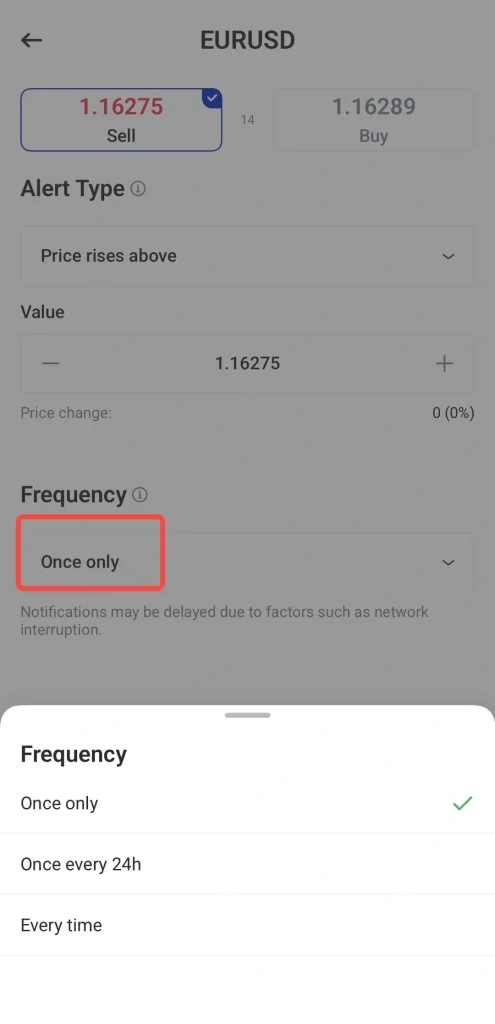
7. Select the alert frequency:
- Every time
- Once only
- Once every 24h
8. Tap Add Alert to create the price alert.
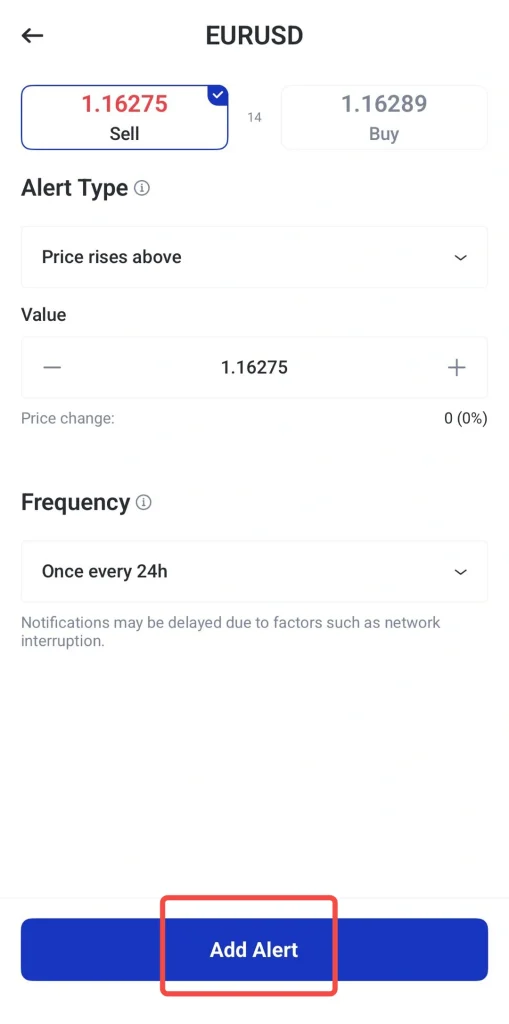
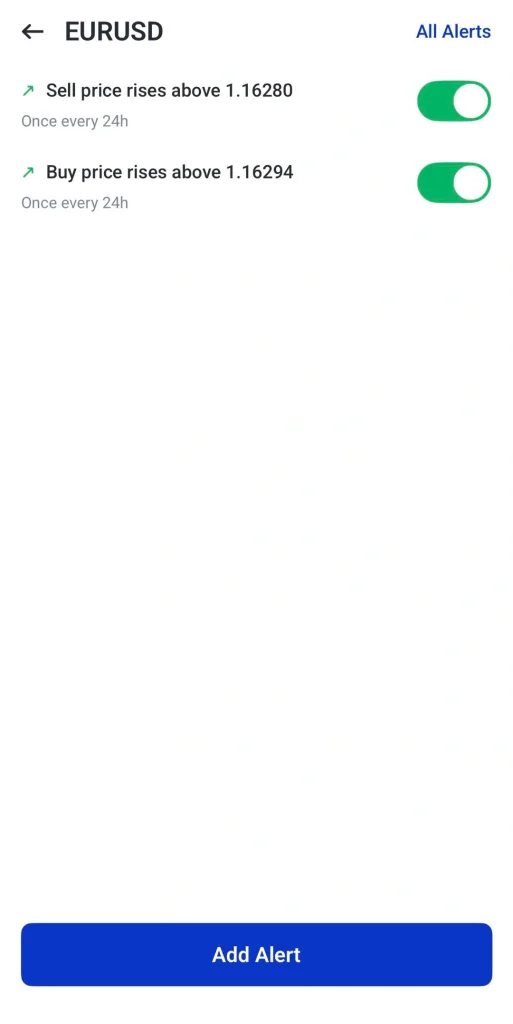
The app will notify you when the market reaches the selected level. This allows traders to prepare for potential setups instead of entering too early.
How to Remove Price Alerts on the VT Markets App
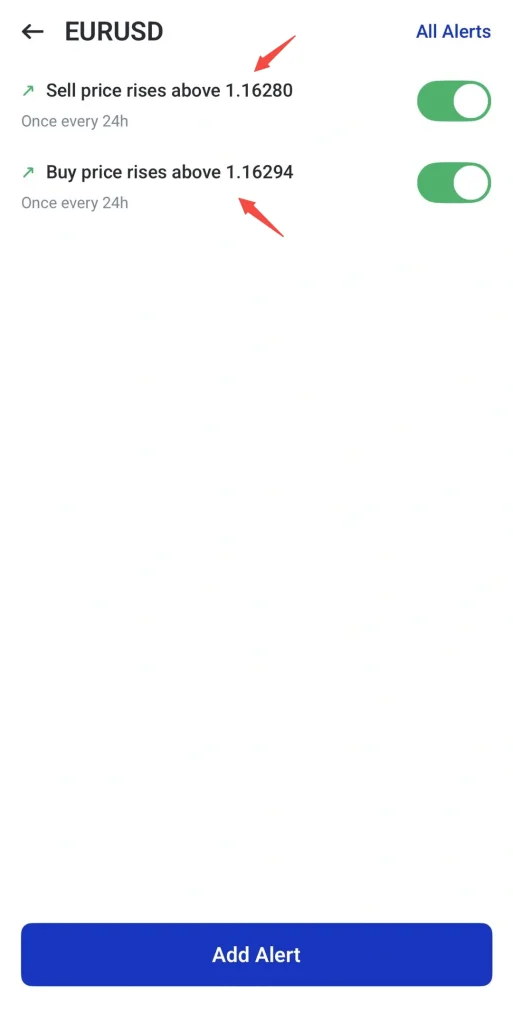
1. To remove an existing alert, open the alert list.
2. Select the alert you want to delete.
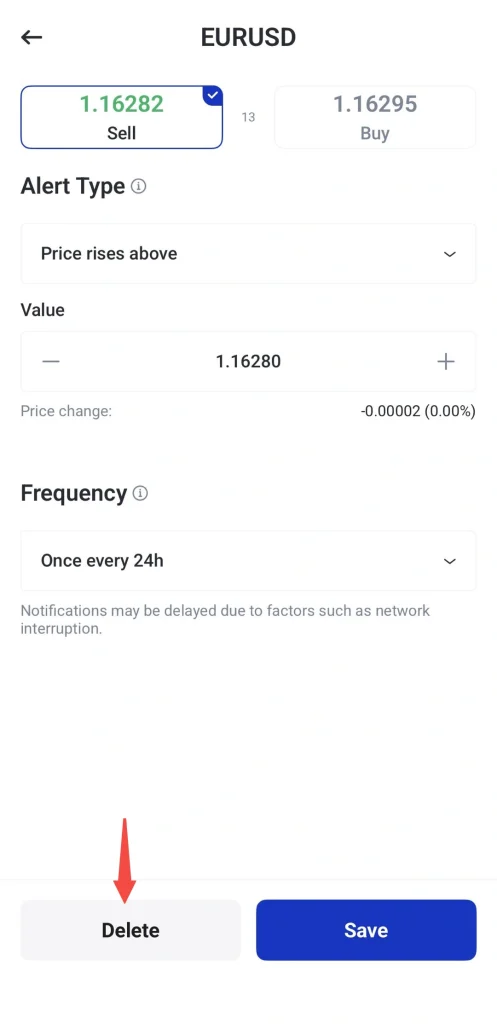
3. Tap Delete.
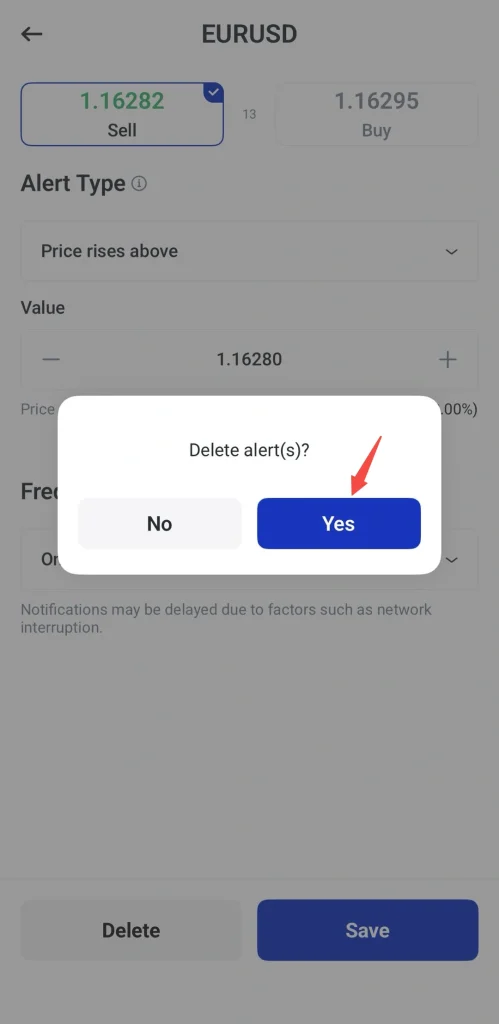
4. Tap Yes to confirm the deletion.
The app will notify you when the market reaches the selected level. This allows traders to prepare for potential setups instead of entering too early.
Step 11: How to Review or Adjust Leverage
Below are the step-by-step process:
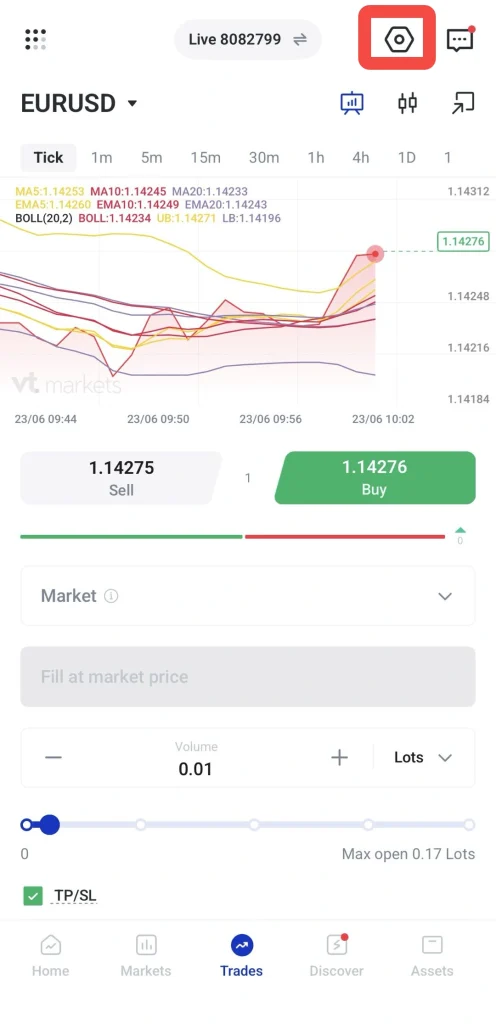
1. Tap the settings icon on the top right of the trading screen.
2. Select Leverage from Trade Settings.
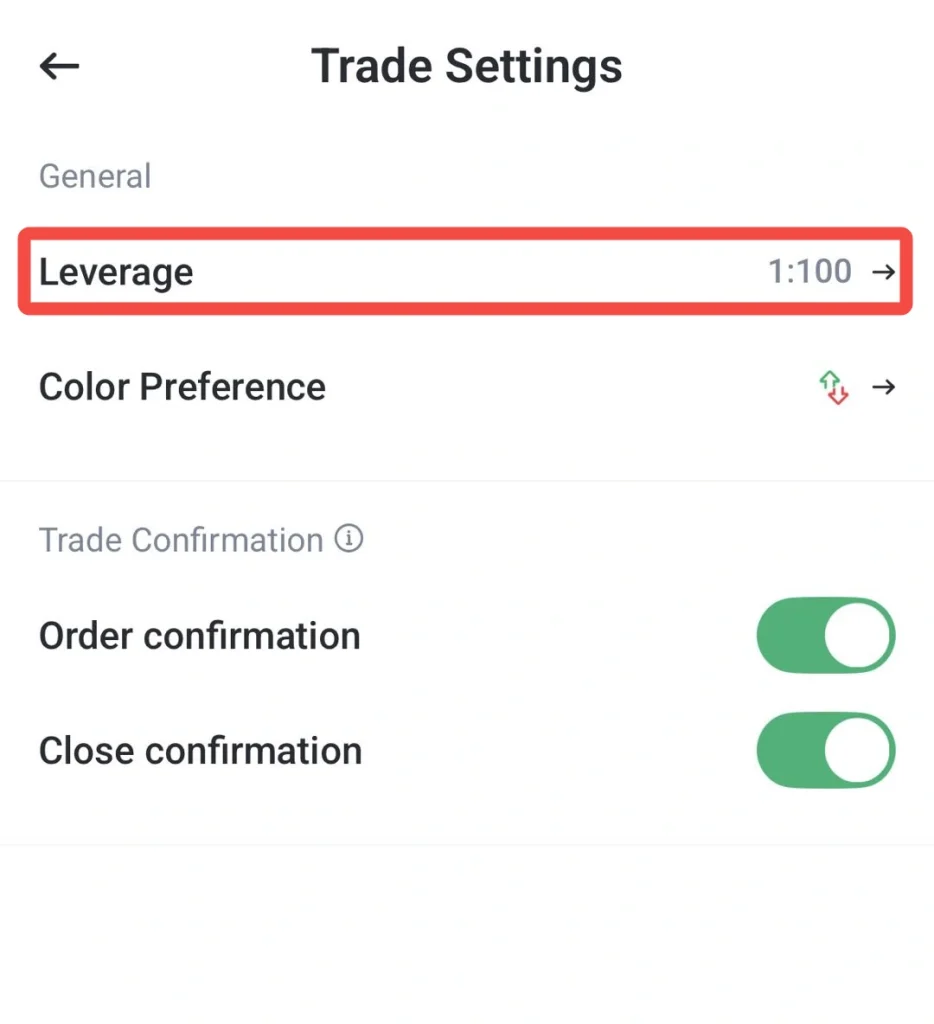
3. On the Leverage page, check your Current Leverage.
4. Tap Leverage Change to view the available leverage options.
5. Select the leverage level based on your trading preference and risk tolerance.
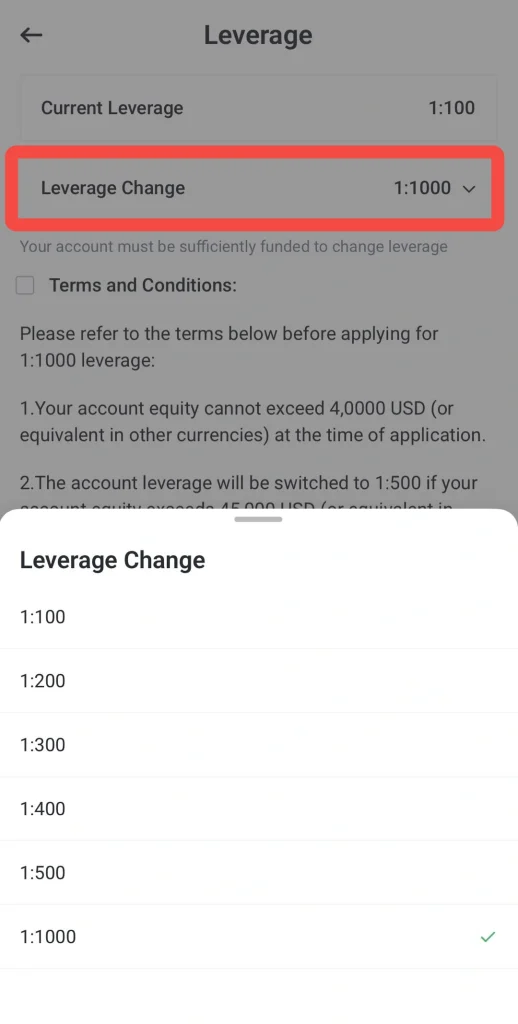
6. Read the terms and conditions carefully.
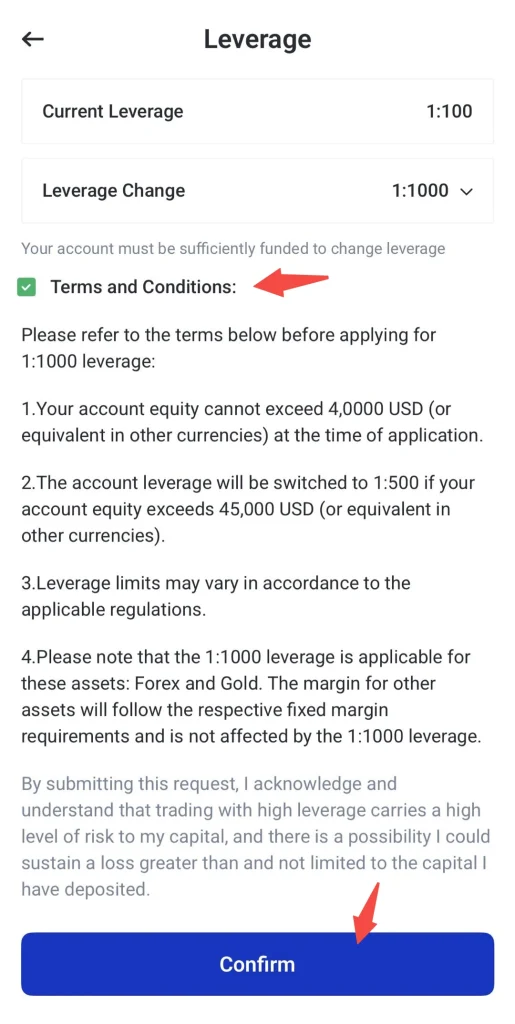
7. Tick the Terms and Conditions checkbox.
8. Tap Confirm to submit the leverage change request.
Note: Leverage options may vary depending on the account type, instrument, equity level, and applicable trading conditions. Some leverage changes may also require the account to be sufficiently funded or meet specific requirements before the request can be submitted.
Step 12: Understanding Positions, Pending Orders, and History
After placing a trade, all activity in the VT Markets app is organised into three main tabs: Positions, Pending Orders, and History.
These sections help traders track active trades, manage waiting orders, and review completed trades.
Positions (Active Trades)
The Positions tab shows all currently active trades that have already been executed in the market.
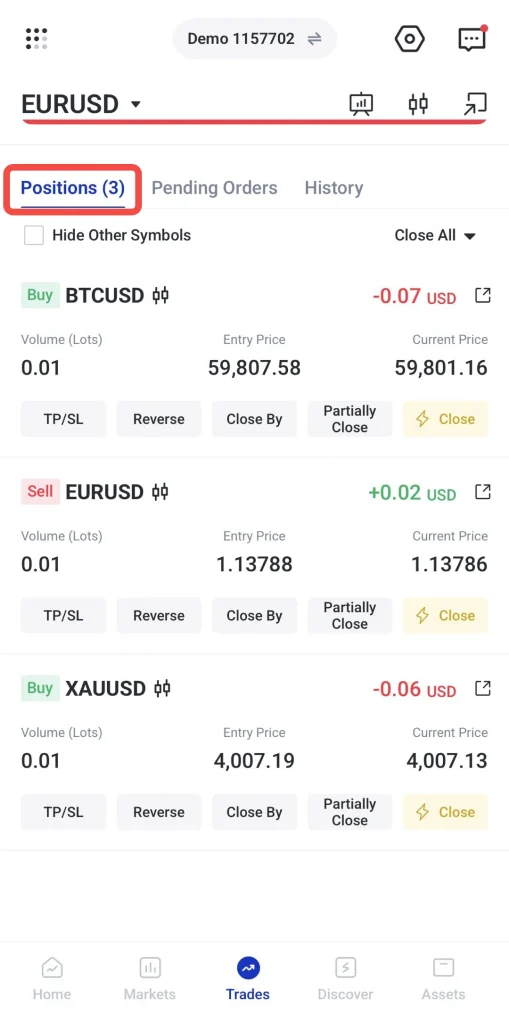
Here you can view:
- Open Buy or Sell trades
- Live profit and loss (PnL)
- Entry price and current price
- Trade size and margin information
This section is used to monitor and manage trades while they are running.
Pending Orders (Waiting Trades)
The Pending Orders tab shows trades that have been placed but are not yet executed.
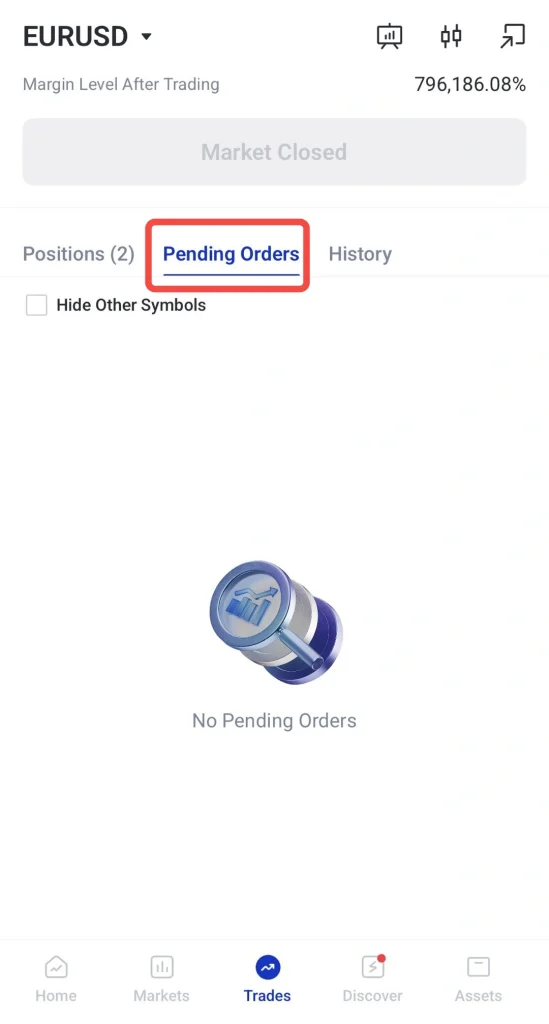
A pending order means the trade will only open when the market reaches a specific price level set by the trader.
For example:
- Buy order waiting at a lower price level
- Sell order waiting at a higher price level
Pending orders remain inactive until the market condition is met, after which they automatically move into the Positions tab.
History (Completed Trades)
The History tab shows all completed or closed trades.
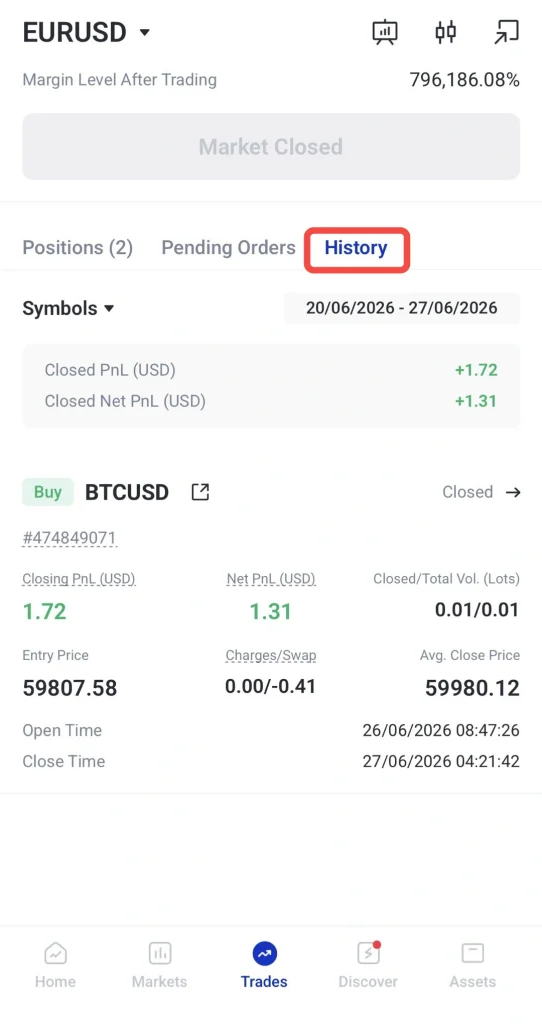
Here traders can review:
- Closed profit or loss (PnL)
- Entry and exit prices
- Trade duration
- Fees or swap charges
This section is used for performance tracking and trade review.
Start Your Trading Journey with VT Markets
Create a live account with VT Markets today and trade CFDs across 1,000+ global markets, including forex, precious metals, commodities, shares and more.
Frequently Asked Questions
What is the first step before placing a trade?
The first step is choosing the instrument you want to trade. Traders should understand the market, check the spread, review recent price movement, and consider any upcoming events before opening a position.
Should beginners use buy or sell first?
There is no fixed answer. A buy order is used when traders expect the price to rise, while a sell order is used when traders expect the price to fall. The decision should be based on analysis, not preference.
Can I set an alert before placing a trade?
Yes. Price alerts can help traders monitor key levels. For example, a trader can set an alert for XAUUSD at 4100 and wait for the app to notify them when the level is reached.
Why is trade size important?
Trade size affects how much the account may gain or lose from price movement. A larger trade size increases exposure, margin usage, and potential risk.
Do I need to set stop loss and take profit?
Stop loss and take profit are not always mandatory, but they are useful risk management tools. A stop loss helps limit potential loss, while a take profit helps define a planned exit level.
Can I change my stop loss or take profit after opening a trade?
Yes, traders can adjust stop loss and take profit levels after opening a trade. Any changes should follow the trader’s strategy and risk plan.
What should I check before confirming a trade?
Before confirming, check the instrument, buy or sell direction, trade size, order type, stop loss, take profit, estimated margin, and trading costs. This helps reduce the chance of placing the wrong order.